 Netspeed Email Setup Guide for iPhone and iPad
This guide will show you step-by-step how to set up your Netspeed hosted domain email account on your iPhone or iPad.
During this guide please replace "yourdomain.com.au" with your own domain name.

Step 1:
Press the Settings button on your home screen.

Step 2:
Scroll down to and press Mail, Contacts and Calendars

Step 3:
Press Add Account...
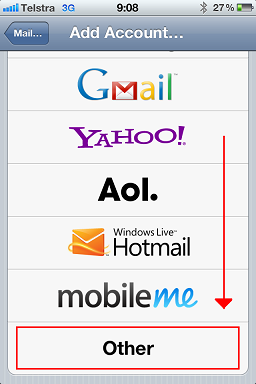
Step 4:
Scroll down and press Other

Step 5:
Press Add Mail Account
Step 6:
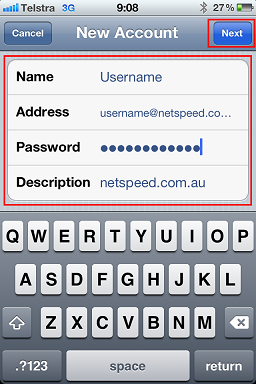
Fill in your details, name, email address, password, and account description.
Then press Next
Step 7:
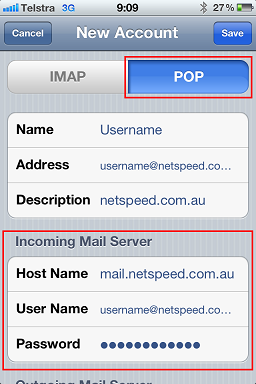
Press POP, make sure POP is highlighted blue as displayed in the picture.
Fill in the Incoming Mail Server details:
Host Name: mail.yourdomain.com.au
Username: yourusername@yourdomain.com.au
Password: Your email password
Tip: if you encounter any errors, try replaceing the Host Name with: mailhost.netspeed.com.au
Step 8:
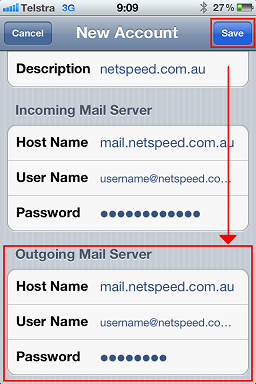
Scroll down and fill in the Outgoing Mail Server details:
These details are not optional.
Host Name: mail.yourdomain.com.au
Username: yourusername@yourdomain.com.au
Password:
Your email password
Then press the Save button.
Tip: if you encounter any errors, try replaceing the Host Name with: mailhost.netspeed.com.au
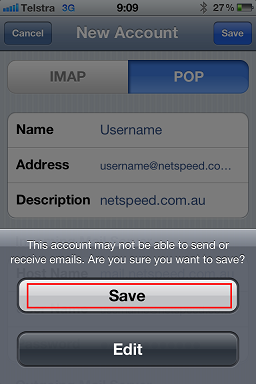
Step 9:
Wait for your iPhone to verify your email account. If you encounter the error shown in the picture, just press Save as we have not finished setting up your email yet.
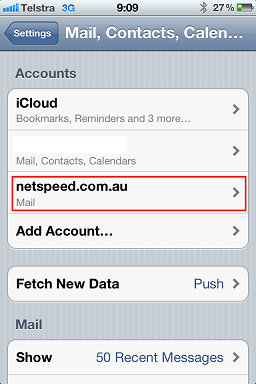
Step 10:
You will have been returned to the Mail, Contacts and Calendars menu, where you will see the email account we just created. Click on this account now.
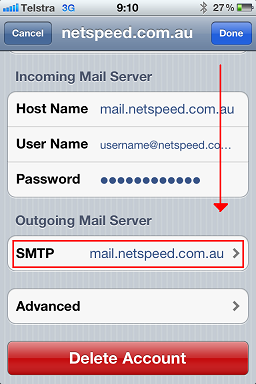
Step 11:
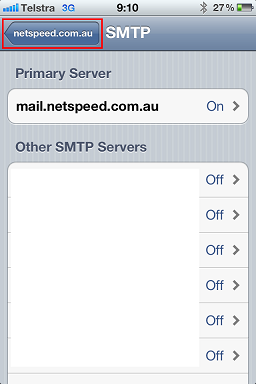
Scroll down and press the SMTP button.
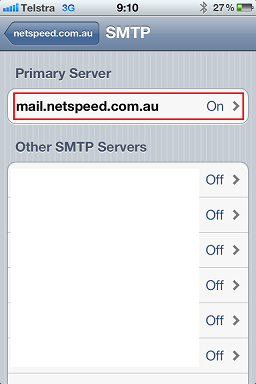
Step 12:
Press the button under Primary Server, mail.yourdomain.com.au

Step 13:
Ensure the settings on this page match the ones pictured.
Host Name: mail.yourdomain.com.au
Username: yourusername@yourdomain.com.au
Password:
Your Netspeed email password
Use SSL: OFF
Authentication: Password
Server Port: 587
Then press the Done button
Tip: if you encounter any errors, try replaceing the Host Name with: mailhost.netspeed.com.au
Step 14:
Click the back button, as pictured.

Step 15:
If nessesary, scroll down again, then press the Advanced button.

Step 16:
Change the Incoming Settings to match the ones pictured:
Use SSL: Off
Authentication: Password
Delete from server: Never
Server Port: 110
Then click the back button as pictured.
You can now press the physical home button on your iPhone or iPad and access email through the Mail app.